apt-get install debian-wizard

Insider infos, master your Debian/Ubuntu distribution

  • About
    • About this blog
    • About me
    • My free software history
  • Support my work
  • Get the newsletter
  • More stuff
    • Support Debian Contributors
    • Other sites
      • My company
      • French Blog about Free Software
      • Personal Website (French)
  • Mastering Debian
  • Contributing 101
  • Packaging Tutorials
You are here: Home / Archives for HOWTO

Auto Mounting Windows Shares in GNOME with Gigolo and gvfs-fuse

October 30, 2012 by Raphaël Hertzog

The traditional way to mount Windows (or Samba) shares involves hardcoding the credentials in a plain-text file and some /etc/fstab entry to mount it automatically at boot time. If you don’t want to store a plain-text copy of your password, you’re bound to mount your shares interactively.

This is clearly sub-optimal and I thought that there must be a better way to handle this in the context of a GNOME desktop (which already supports connecting to such shares in the file browser). So I looked for a solution and after a bit of googling I found one.

Start by installing a few packages:

$ sudo apt-get install gigolo gvfs-fuse

Launch Gigolo, setup your shares as bookmarks and mark them as “Auto-Connect”.
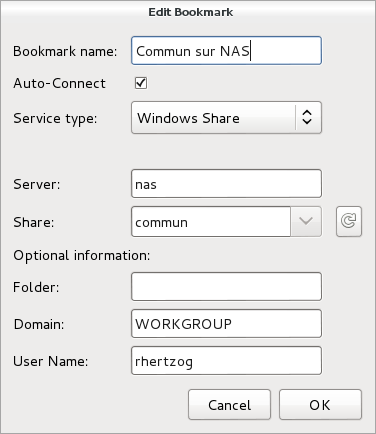
During (first) connection, you will be prompted for your password and you have the possibility to store it in the GNOME keyring (and here it’s encrypted, not in plain-text!).

You should also configure the Gigolo preferences so that it starts minimized in the system tray (because we’re going to run it on session startup):
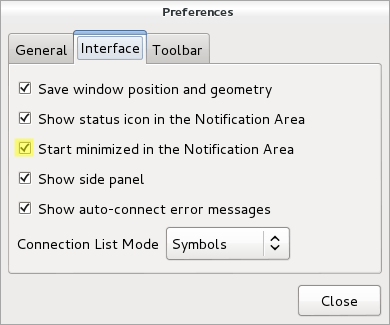
The last step is to ensure that Gigolo is executed at the start of each GNOME session. Unfortunately this GNOME feature is no longer accessible from the control center so you have to execute gnome-session-properties manually (from a terminal or the command line accessible via Alt+F2). Click on “Add” to add a new startup program:
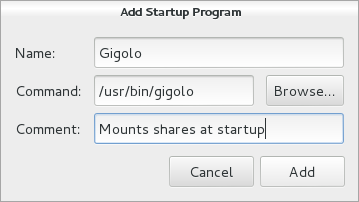
You’re done!

The main limitation is that those shares are not real mounts, instead they are available within GNOME’s virtual file system (GVFS). If you use only 100% GNOME application, then it’s not a problem but otherwise it’s pretty annoying. You can’t “cd” in those shares from a terminal for example.

There’s a workaround though, it’s called “gvfs-fuse” and you installed it right at the start of this HOWTO. This service hooks into GVFS and exports all the virtual filesystem(s) in a real fuse-based mount that is automatically setup in ~/.gvfs/. However for this to work, the user must be in the “fuse” group. So you should run something like this:

$ sudo adduser $USER fuse

By the way, I haven’t found a way to use a non-hidden directory so if you want this directory to be more visible, I suggest that you create a symlink pointing to it.

Do you want to read more HOWTO like this one? Click here to subscribe to my free newsletter, you can opt to receive future articles by email.

How to use quilt to manage patches in Debian packages

August 8, 2012 by Raphaël Hertzog

Most Debian source packages are using the “3.0 (quilt)” format. This means that Debian changes to upstream files are managed in a quilt patch series. Knowledge of quilt is thus a must if you want to get involved in some serious packaging work. Don’t worry, this tutorial will teach you how to use quilt in the context of Debian packaging.

Pre-requisites

Install the packaging-dev package to get a decent set of packages to do Debian packaging. It includes the quilt package.

$ sudo apt-get install packaging-dev

What’s quilt?

Read the description of the Debian package:

Quilt manages a series of patches by keeping track of the changes each of them makes. They are logically organized as a stack, and you can apply, un-apply, update them easily by traveling into the stack (push/pop).

Quilt is good for managing additional patches applied to a package received as a tarball or maintained in another version control system. The stacked organization is proven to be efficient for the management of very large patch sets (more than hundred patches). As matter of fact, it was designed by and for Linux kernel hackers (Andrew Morton, from the -mm branch, is the original author), and its main use by the current upstream maintainer is to manage the (hundreds of) patches against the kernel made for the SUSE distribution.

The various files involved

Stack of files PictureTo better understand the various quilt commands, you should have a basic idea of how the tool works. The “stack of patches” is maintained in a dedicated directory (“patches” by default, but in Debian packages we override this value to “debian/patches”). This directory contains the patch files and a “series” file that gives an ordered list of patches to apply. Example:
$ ls debian/patches/
01_use_stdlib_htmlparser_when_possible.diff
02_disable-sources-in-sphinxdoc.diff
03_manpage.diff
06_use_debian_geoip_database_as_default.diff
series
$ cat debian/patches/series
01_use_stdlib_htmlparser_when_possible.diff
02_disable-sources-in-sphinxdoc.diff
03_manpage.diff
06_use_debian_geoip_database_as_default.diff

When quilt is used, it also maintains some internal files in a directory of its own (it’s named “.pc”). This directory is used to know what patches are currently applied (.pc/applied-patches) and to keep backup copies of files modified by the various patches.

Configuring quilt

Before going further, you should put this in your ~/.quiltrc file:

for where in ./ ../ ../../ ../../../ ../../../../ ../../../../../; do
    if [ -e ${where}debian/rules -a -d ${where}debian/patches ]; then
        export QUILT_PATCHES=debian/patches
        break
    fi
done

This ensures that quilt will always use “debian/patches” instead of “patches” when your current directory is within a Debian source package where debian/patches exists. If you only use quilt for debian packaging, then you can be more expedient and put a simple “export QUILT_PATCHES=debian/patches” in that file.

As a matter of personal preferences, I also have those lines in my ~/.quiltrc:

QUILT_PUSH_ARGS="--color=auto"
QUILT_DIFF_ARGS="--no-timestamps --no-index -p ab --color=auto"
QUILT_REFRESH_ARGS="--no-timestamps --no-index -p ab"
QUILT_DIFF_OPTS='-p'

It enables syntax coloring for the output of several commands and customizes the generated patches to get rid of useless information. I recommend you to use those settings too.

Applying and unapplying patches, navigating in the stack of patches

When you already have a patch series, you can navigate in the stack of patches so that any subset of consecutive patches (starting from the bottom) can be applied. quilt series will list all patches known by quilt.

You can apply all patches with quilt push -a or unapply them all with quilt pop -a. You can also verify what patches are applied (quilt applied) or unapplied (quilt unapplied). quilt push applies the next unapplied patch (i.e. the patch returned by quilt next) and quilt pop unapplies the last applied patch (i.e. the patch returned by quilt top). You can give a patch name as parameter to quilt push/pop and it will apply/unapply all the patches required until the given patch is on the top.

Here are some examples of navigation in a quilt patch series

$ quilt series
02_disable-sources-in-sphinxdoc.diff
03_manpage.diff
06_use_debian_geoip_database_as_default.diff
$ quilt applied
No patches applied
$ quilt next
02_disable-sources-in-sphinxdoc.diff
$ quilt push
Applying patch 02_disable-sources-in-sphinxdoc.diff
patching file docs/conf.py

Now at patch 02_disable-sources-in-sphinxdoc.diff
$ quilt push
Applying patch 03_manpage.diff
patching file docs/man/django-admin.1

Now at patch 03_manpage.diff
$ quilt applied
02_disable-sources-in-sphinxdoc.diff
03_manpage.diff
$ quilt unapplied
06_use_debian_geoip_database_as_default.diff
$ quilt pop -a
Removing patch 03_manpage.diff
Restoring docs/man/django-admin.1

Removing patch 02_disable-sources-in-sphinxdoc.diff
Restoring docs/conf.py

No patches applied
$ quilt push 03_manpage.diff
Applying patch 02_disable-sources-in-sphinxdoc.diff
patching file docs/conf.py

Applying patch 03_manpage.diff
patching file docs/man/django-admin.1

Now at patch 03_manpage.diff
$ quilt top
03_manpage.diff

Creating a new patch

If there’s no quilt series yet, you want to create the “debian/patches” directory first.

If you already have one, you need to decide where to insert the new patch. Quilt will always add the new patch just after the patch which is currently on top. So if you want to add the patch at the end of the series, you need to run “quilt push -a” first.

Then you can use quilt new name-of-my-patch.diff to tell quilt to insert a new empty patch after the current topmost patch. In this operation quilt does almost nothing except updating the series file and recording the fact that the new patch is applied (even if still empty at this point!).

Now to add changes in this patch, you’re supposed to modify files but only after having informed quilt of your intent to modify those files. You do this with quilt add file-to-modify. At this point quilt will make a backup copy of that file so that it can generate the final patch when you’re done with your changes. It’s quite common to forget this step and to be unable to generate the patch afterward. That’s why I recommend you to use quilt edit file-to-modify which is a shorthand for doing quilt add and then opening the file in your favorite text editor.

If you want, you can review your work in progress with quilt diff.

When you’re done with the changes, you should call quilt refresh to generate the patch (or to update it if it was already existing). And since you’re a good packager, you call quilt header --dep3 -e to add DEP-3 meta-information to your patch header.

Importing an external patch

If someone else already prepared a patch, you can just import it right away with quilt import /tmp/the-patch. If you want to import it under a better name you can use the option “-P better-patch-name”. Like quilt new, it inserts the patch after the topmost patch.

Updating patches for a new upstream version

With some luck, your patches will still apply with some offsets in line numbers (quilt displays those offsets) and sometimes with some fuzz:

$ quilt push
[...]
Hunk #1 succeeded at 1362 (offset 11 lines).
Hunk #2 succeeded at 1533 with fuzz 1 (offset 4 lines).
[...]

While offsets are nothing to worry about (it means some lines were added and/or removed before the patched part), fuzz means that patch had to ignore some context lines to find the place where to apply the changes. In that case, you need to double check that patch did the right thing because it might have made changes somewhere where it shouldn’t. Also, you’ll have to update those patches because dpkg-source doesn’t accept any fuzz.

If you’re confident that all patches are correctly applied by quilt, you can refresh them to get rid of those warnings:

$ quilt pop -a
[...]
$ while quilt push; do quilt refresh; done

That was for the easy case. Now let’s deal with the case where some of the patches no longer apply. There’s one case that is usually nice to have:

$ quilt push
Applying patch 04_hyphen-manpage.diff
patching file docs/man/django-admin.1
Hunk #1 FAILED at 194.
1 out of 1 hunk FAILED -- rejects in file docs/man/django-admin.1
Patch 04_hyphen-manpage.diff can be reverse-applied

When the patch can be reverse-applied, it means that the upstream authors included the Debian patch (or that they made the same change even though you forgot to forward the patch). You can thus get rid of it:

$ quilt delete -r 04_hyphen-manpage.diff
Removed patch 04_hyphen-manpage.diff

Note that without the -r the patch is only dropped from the series file. With -r the patch file is also removed.

But there’s a less desirable case where the patch is still relevant but it doesn’t apply any longer:

$ quilt push
Applying patch 01_disable_broken_test.diff
patching file tests/regressiontests/test_utils/tests.py
Hunk #1 FAILED at 422.
1 out of 1 hunk FAILED -- rejects in file tests/regressiontests/test_utils/tests.py
Patch 01_disable_broken_test.diff does not apply (enforce with -f)

In that case, you should follow quilt’s advice to force the patch application, manually apply the parts of the patch that were rejected, and then refresh the patch.

$ quilt push -f
Applying patch 01_disable_broken_test.diff
patching file tests/regressiontests/test_utils/tests.py
Hunk #1 FAILED at 422.
1 out of 1 hunk FAILED -- saving rejects to file tests/regressiontests/test_utils/tests.py.rej
Applied patch 01_disable_broken_test.diff (forced; needs refresh)
$ vim tests/regressiontests/test_utils/tests.py    
$ quilt refresh
Refreshed patch 01_disable_broken_test.diff

Other quilt commands

You should probably read quilt’s manual page too to learn about the various other commands and options that exist.

There’s at least quilt rename new-name that you can also find useful to rename the topmost patch (you can use “-P patch-to-rename” to rename a patch which is not currently at the top).

Feedback

Please leave comments if you have suggestions of improvements, or if there are some tips that are good to know. I might incorporate them in this article.

Feel free to share this article with newbie packagers which are struggling with quilt. For your convenience, you can also refer to this article with this URL: https://raphaelhertzog.com/go/quilt

Found it useful? Be sure to not miss other packaging tips (or lessons), click here to subscribe to my free newsletter and get new articles by email.

Debian Cleanup Tip #5: identify cruft that can be removed from your Debian system

February 28, 2011 by Raphaël Hertzog

Last week we learned how to identify and restore packages whose files have been corrupted. This time we’ll concentrate ourselves on the non-packaged files…

Non-packaged files

They are files which are not provided by a Debian package, or in other words, files where dpkg --search finds no associated package:

$ dpkg --search /srv/cvs
dpkg-query: no path found matching pattern /srv/cvs

You always have such files on your system, at least all your own files in /home. But many daemons also create files as part of their work (and they are usually stored in /var): internal files for a database server, mail spool for a mail server, etc. Those are normal and you want to leave them alone.

But you might have non-packaged files in /usr and that should not be the case if you install everything from packages. It would thus be useful to be able to list those files in order to detect a software that has been manually installed.

Manually installed software is not a good idea

Such an installation might cause troubles for example by taking precedence over the same software provided in a Debian package. Over time the local installation will not be upgraded while the packaged one will.

The other packages which depend on this software will believe they have the latest version since their dependency is satisfied but in fact they are using the older version since it takes precedence.

So you want to get rid of those? Let’s see how we can find them.

Use cruft to identify non-packaged files

As I explained above, there are many non-packaged files that are legitimate and that you don’t want to remove. That’s why cruft does something more elaborated than a scan of the filesystem and a check of dpkg’s database.

It provides a way for packages to say which files they might legitimately create during run-time and that cruft should not report. And it knows of many such files. But it’s far from exhaustive and definitely not up-to-date.

So you should always take its output with suspicion and consider twice where the file came from. Do not trust it blindly to remove the files… you have been warned.

How to use cruft

You should give it a list of directories to ignore to reduce the noise in the output, for example like this:

$ sudo cruft -d / -r report --ignore /home --ignore /var --ignore /tmp
$ less report
cruft report: mercredi 23 février 2011, 15:45:34 (UTC+0100)

---- missing: ALTERNATIVES ----
        /etc/alternatives/cli-csc.1.gz
        /usr/share/man/man1/cli-csc.1.gz
---- missing: dpkg ----
        /etc/xdg/autostart/gnome-power-manager.desktop
        /usr/lib/libpython2.6_d.so.1.0-gdb.py
        /usr/share/fonts/X11/100dpi
        /usr/share/fonts/X11/75dpi
---- unexplained: / ----
        /boot
        /dev
        /etc/.java
        /etc/.java/.systemPrefs
[...]
        /usr/lib/pymodules/python2.6
        /usr/lib/pymodules/python2.6/.path
        /usr/lib/pymodules/python2.6/Brlapi-0.5.5.egg-info
[...]

Note that it doesn’t traverse filesystems so if your /usr is on another partition than /, you will need to use the option -d "/ /usr" to have it scan both.

Analyze the report

Now you can quietly go through the report that has been generated and decide which files need to be removed or not. The report also contains missing files (files which should exist according to the dpkg database but which are not there) but the bulk of the listing will be in the “unexplained” section: files which are not part of any package (and whose presence is not explained by any other explain script that packages can ship).

Again take this with great suspicion, and you should rather not delete a file if you don’t know it got there in the first place. For instance, on my system it lists many files below /usr/lib/pymodules/ and those are legitimate: they come from Debian packages but they are copied there dynamically from /usr/{lib,share}/pyshared in order to support multiple python versions. If you remove those files, you effectively break your system.

You will also find many .pyc files created by python packages, they are a byte-compiled version of the corresponding .py file. Removing them breaks nothing but you loose a bit of performance.

On the opposite, most of the files below /usr/local/ are likely the result of some manual software installation and those should be safe to remove (if you know that you are not using the corresponding software).

Conclusion: useful but needs work

In summary, you can use cruft to identify non-packaged files and maybe learn a bit more about what got manually installed on the system, but it requires some patience to go through the report as many of the files reported are false positives.

Yes, cruft badly needs supplementary volunteers to cope with the many ways packages legitimately generate non-packaged files. It’s not even complicated work: the package is mostly in shell and in Perl, and /usr/share/doc/cruft/README.gz explains how it all works.

Do you want to read more tutorials like this one? Click here to subscribe to my free newsletter, you can opt to receive future articles by email.

Debian Cleanup Tip #4: find broken packages and reinstall them

February 21, 2011 by Raphaël Hertzog

Last week, we learned to get rid of third-party packages, now we’re going one step further: we’ll verify if the files of the installed packages are still exactly like they were when they got installed.

If you’re a tinkerer and hand-edit some files for some quick tests, or if you tend to re-install newer versions of some packages from the sources, you might have overwritten some packaged files and it would be good to be able to detect this (and remedy to the problem). debsums is the tool that makes it possible.

Use debsums to identify modified files

I often use debsums when I take over the maintenance of a Debian server because I want to verify which files have been modified by the former administrator.

Without any argument, debsums is very verbose, it will list every installed file (except configuration files) and tells whether it’s unmodified (“OK”) or not (“FAILED”).

$ sudo debsums
/usr/bin/a2ps                                               OK
[...]

With the --all option, it will verify all files including configuration files. With --config it will verify only the configuration files.

With the --changed option, debsums will only list modified files among those inspected. The following invocation will thus list all files which have been modified on the system and which are not configuration files.

$ sudo debsums --changed
/usr/lib/perl5/AptPkg/Config.pm
/usr/lib/perl5/AptPkg.pm
[...]

Find out the package affected and reinstall it

debsums told me that /usr/lib/perl5/AptPkg.pm was modified. Indeed I remember having manually installed a modified version of that perl module for a quick test.

I find out the affected package with dpkg --search /usr/lib/perl5/AptPkg.pm: it’s libapt-pkg-perl.

Now I just have to reinstall this package to overwrite the modified files with the original ones:

$ sudo aptitude reinstall libapt-pkg-perl
[...]
# Or with apt-get
$ sudo apt-get --reinstall install libapt-pkg-perl
[...]

You might have to repeat the process until debsums no longer reports any modified file.

Do you want to read more tutorials like this one? Click here to subscribe to my free newsletter, you can opt to receive future articles by email.

  • 1
  • 2
  • 3
  • …
  • 5
  • Next Page »

Get the Debian Handbook

Available as paperback and as ebook.
Book cover

Email newsletter

Get updates and exclusive content by email, join the Debian Supporters Guild:

Follow me

  • Email
  • Facebook
  • GitHub
  • RSS
  • Twitter

Discover my French books

Planets

  • Planet Debian

Archives

I write software, books and documentation. I'm a Debian developer since 1998 and run my own company. I want to share my passion and knowledge of the Debian ecosystem. Read More…

Tags

3.0 (quilt) Activity summary APT aptitude Blog Book Cleanup conffile Contributing CUT d-i Debconf Debian Debian France Debian Handbook Debian Live Distro Tracker dpkg dpkg-source Flattr Flattr FOSS Freexian Funding Git GNOME GSOC HOWTO Interview LTS Me Multiarch nautilus-dropbox News Packaging pkg-security Programming PTS publican python-django Reference release rolling synaptic Ubuntu WordPress

Recent Posts

  • Freexian is looking to expand its team with more Debian contributors
  • Freexian’s report about Debian Long Term Support, July 2022
  • Freexian’s report about Debian Long Term Support, June 2022
  • Freexian’s report about Debian Long Term Support, May 2022
  • Freexian’s report about Debian Long Term Support, April 2022

Copyright © 2005-2021 Raphaël Hertzog