apt-get install debian-wizard

Insider infos, master your Debian/Ubuntu distribution

  • About
    • About this blog
    • About me
    • My free software history
  • Support my work
  • Get the newsletter
  • More stuff
    • Support Debian Contributors
    • Other sites
      • My company
      • French Blog about Free Software
      • Personal Website (French)
  • Mastering Debian
  • Contributing 101
  • Packaging Tutorials
You are here: Home / Archives for Documentation / User Documentation

How to choose your SSH agent with Wayland and systemd

November 10, 2025 by Raphaël Hertzog 4 Comments

If you read the above title, you might wonder how the switch to wayland (yes, the graphical stack replacing the venerable X11) can possibly relate to SSH agents. The answer is easy.

For as long as I can remember, as a long time user of gpg-agent as SSH agent (because my SSH key is a GPG sub-key) I relied on /etc/X11/Xsession.d/90gpg-agent that would configure the SSH_AUTH_SOCK environment variable (pointing to gpg-agent’s socket) provided that I added enable-ssh-support in ~/.gnupg/gpg-agent.conf.

Now when I switched to Wayland, that shell script used in the startup sequence of Xorg was no longer used. During a while I cheated a bit by setting SSH_AUTH_SOCK directly in my ~/.bashrc. But that only works for terminals, and not for other applications that are started by the session manager (which is basically systemd --user).

So how is that supposed to work out of the box nowadays? The SSH agents (as packaged in Debian) have all adopted the same trick, their .socket unit have an ExecStartPost setting which runs systemctl --user set-environment SSH_AUTH_SOCK=some-value. This command dynamically modifies the environment of the running systemd daemon and thus influences the environment for the future units started. Putting this in a socket unit ensures an early run, before most of the applications are started so it’s a good choice. They tend to also explicitly ensure this with a directive like Before=graphical-session-pre.target.

However, in a typical installation you end up with multiple SSH agents (right now I have ssh-agent, gpg-agent, and gcr-ssh-agent), which one is the one that the user ends up using? Well, that is not clearly defined, the one that wins is the one that runs last… because each of them overwrites the value in the systemd environment.

Some of them fight to have that place (cf #1079246 for gcr-ssh-agent) by setting explicit After directives. In the above bug I argue that we should let gpg-agent.socket have the priority since that’s the only one that is not enabled by default and that requires the user to opt-in. However, ultimately there will always be cases where you will want to be explicit about the SSH agent that should win.

You could rely on systemd overrides to add/remove ordering directives but that’s pretty fragile. Instead the right way to deal with this is to “mask” the socket units of the SSH agents that you don’t want. Note that disabling (i.e. systemctl --user disable) either will not work[1] or will not be sufficient[2]. In my case, I wanted to keep gpg-agent.socket so I masked gcr-ssh-agent.socket and ssh-agent.socket:

$ systemctl --user mask ssh-agent.socket gcr-ssh-agent.socket
Created symlink '/home/rhertzog/.config/systemd/user/ssh-agent.socket' → '/dev/null'.
Created symlink '/home/rhertzog/.config/systemd/user/gcr-ssh-agent.socket' → '/dev/null'.

Note that if you want that behaviour to apply to all users of your computer, you can use sudo systemctl --global mask ssh-agent.socket gcr-ssh-agent.socket. Now on next login, you will only get a single ssh agent socket unit that runs and the SSH_AUTH_SOCK value will thus be predictable again!

Hopefully you will find that useful as it’s already the second time that I stumble upon this either for me or for a relative. Next time, I will know where to look it up. 🙂

[1]: If you try to run systemctl --user disable gcr-ssh-agent.socket, you will get a message saying that it will not work because the unit is enabled for all users at the “global” level. You can do it with --global instead of --user but it doesn’t help, cf below.

[2]: Disabling an unit basically means stopping to explicitely schedule its startup as part of a desired target. However, the unit can still be started as a dependency of other units and that’s the case here because a socket unit will typically be pulled in by its corresponding service unit.

Auto Mounting Windows Shares in GNOME with Gigolo and gvfs-fuse

October 30, 2012 by Raphaël Hertzog

The traditional way to mount Windows (or Samba) shares involves hardcoding the credentials in a plain-text file and some /etc/fstab entry to mount it automatically at boot time. If you don’t want to store a plain-text copy of your password, you’re bound to mount your shares interactively.
This is clearly sub-optimal and I thought that there must be a better way to handle this in the context of a GNOME desktop (which already supports connecting to such shares in the file browser). So I looked for a solution and after a bit of googling I found one.

Start by installing a few packages:

$ sudo apt-get install gigolo gvfs-fuse

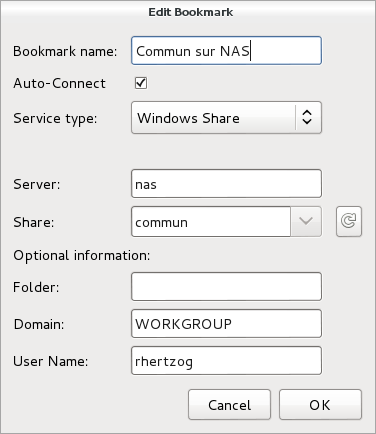
Launch Gigolo, setup your shares as bookmarks and mark them as “Auto-Connect”.

During (first) connection, you will be prompted for your password and you have the possibility to store it in the GNOME keyring (and here it’s encrypted, not in plain-text!).

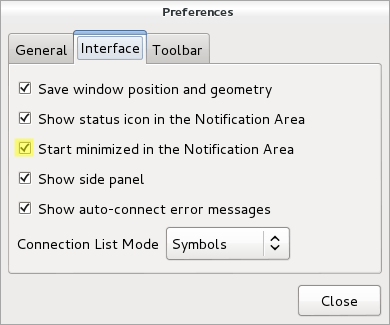
You should also configure the Gigolo preferences so that it starts minimized in the system tray (because we’re going to run it on session startup):

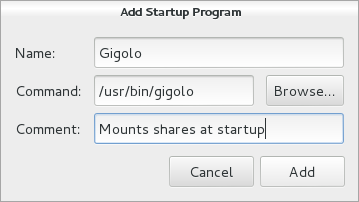
The last step is to ensure that Gigolo is executed at the start of each GNOME session. Unfortunately this GNOME feature is no longer accessible from the control center so you have to execute gnome-session-properties manually (from a terminal or the command line accessible via Alt+F2). Click on “Add” to add a new startup program:

You’re done!

The main limitation is that those shares are not real mounts, instead they are available within GNOME’s virtual file system (GVFS). If you use only 100% GNOME application, then it’s not a problem but otherwise it’s pretty annoying. You can’t “cd” in those shares from a terminal for example.

There’s a workaround though, it’s called “gvfs-fuse” and you installed it right at the start of this HOWTO. This service hooks into GVFS and exports all the virtual filesystem(s) in a real fuse-based mount that is automatically setup in ~/.gvfs/. However for this to work, the user must be in the “fuse” group. So you should run something like this:

$ sudo adduser $USER fuse

By the way, I haven’t found a way to use a non-hidden directory so if you want this directory to be more visible, I suggest that you create a symlink pointing to it.

Do you want to read more HOWTO like this one? Click here to subscribe to my free newsletter, you can opt to receive future articles by email.

Understand dpkg and don’t get stuck with a maintainer script failure

September 13, 2011 by Raphaël Hertzog

Continuing my series of articles on dpkg’s errors, this time I’ll cover a pretty common one which has several variations:

Setting up acpid (1:2.0.12-1) ...
rm: cannot remove `/etc/rc1.d/K20acpid': No such file or directory
dpkg: error processing acpid (--configure):
 subprocess installed post-installation script returned error exit status 1
Errors were encountered while processing:
 acpid

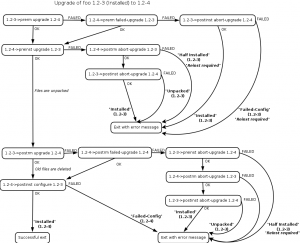
Even if dpkg is failing and outputting the error message, the real problem is not in dpkg but in the installed package (acpid in the example above). As we already learned, a package contains not only files but also “maintainer scripts” that are executed at various points of the installation process (see some useful graphics to understand how they are called, thanks to Margarita Manterola).

Maintainer scripts in a package upgrade

In the introductory example it was acpid’s “post-installation script” that failed, and dpkg is only forwarding that failure back to the caller. The maintainer scripts are stored in /var/lib/dpkg/info/. You can thus inspect them and even modify them if you hit a bug and want to work around it (do this only if you understand what you do!).

One common modification is to add “set -x” at the start of the script and to retry the failing operation. That way you can see what’s executed exactly. Here’s what the output could look like after the addition of “set -x” to /var/lib/dpkg/info/acpid.postinst:

$ sudo dpkg --configure acpid
Setting up acpid (1:2.0.12-1) ...
+ dpkg --compare-versions 1:2.0.11-1 lt-nl 1.0.10-3
+ dpkg --compare-versions 1:2.0.11-1 lt-nl 1.0.6-16
+ dpkg --compare-versions 1:2.0.11-1 lt 1.0.6-6
+ rm /etc/rc1.d/K20acpid
rm: cannot remove `/etc/rc1.d/K20acpid': No such file or directory
dpkg: error processing acpid (--configure):
 subprocess installed post-installation script returned error exit status 1
Errors were encountered while processing:
 acpid

This output helps you locate the command that is actually failing. Here’s it’s relatively easy since we have an error message from “rm”. And the fix is trivial too, we replace “rm” with “rm -f” so that it doesn’t fail when the file doesn’t exist (this is a fake bug I made up for this article—I just added a failing rm call—but it’s inspired by real bugs I experienced).

Maintainer scripts are supposed to be idempotent: we should be able to execute them several times in a row without bad consequences. It happens from time to time that the maintainer gets this wrong… on the first try it works, so he uploads his package and we discover the problem only later once someone ended up executing the same code twice for some reason.

Follow me on Identi.ca, Twitter, Facebook and Google+. Or subscribe to this blog by RSS or by email.

Understanding dpkg’s file overwrite error

August 1, 2011 by Raphaël Hertzog

This is probably one of the most common errors. You’re very likely to encounter it, in particular if you tend to mix packages from various origins/distributions, or if you’re using unstable. It looks like this:

Unpacking gbonds-data (from .../gbonds-data_2.0.3-2_all.deb) ...
dpkg: error processing /var/cache/apt/archives/gbonds-data_2.0.3-2_all.deb (--unpack):
 trying to overwrite '/usr/share/omf/gbonds/gbonds-C.omf', which is also in package gbonds 2.0.2-9
dpkg-deb: subprocess paste killed by signal (Broken pipe)

A given file can only be provided by a single package. So if you try to install a package that provides a file that is already part of another installed package, it will fail with a message similar to the above one.

Sometimes this failure will be meaningful because dpkg prevented you to install two unrelated packages that happen to have a real file conflict. In other cases, like in the example above, this failure is just the result of a mistake.

Folder with gears

The version 2.0.3-1 of gbonds split the architecture independent files in a separate package called gbonds-data but the maintainer forgot to add the required control field in gbonds-data (Replaces: gbonds (<< 2.0.3-1)). That field allows dpkg to take over files from the listed packages.

If you want to ignore the file conflict and let dpkg take over the file (even without the Replaces), you can pass the --force-overwrite command-line option.

But you’re not using dpkg directly, you’re probably using an APT frontend (like apt-get or aptitude). Don’t worry, there’s a simple way to define custom dpkg options to use:

# apt-get -o Dpkg::Options::="--force-overwrite" install gbonds-data

The syntax is a bit weird, but the “::” after “Options” is important, it’s the syntax that defines a list item value instead of a single value. And you can effectively pass multiple options to dpkg by putting multiple -o Dpkg::Options::="…".

If you want to read more articles like this one, click here to subscribe to my free newsletter. You can also follow me on Identi.ca, Twitter and Facebook.

  • 1
  • 2
  • 3
  • …
  • 7
  • Next Page »

Get the Debian Handbook

Available as paperback and as ebook.
Book cover

Email newsletter

Get updates and exclusive content by email, join the Debian Supporters Guild:

Follow me

  • Email
  • Facebook
  • GitHub
  • RSS
  • Twitter

Discover my French books

Planets

  • Planet Debian

Archives

I write software, books and documentation. I'm a Debian developer since 1998 and run my own company. I want to share my passion and knowledge of the Debian ecosystem. Read More…

Tags

3.0 (quilt) Activity summary APT aptitude Blog Book Cleanup conffile Contributing CUT d-i Debconf Debian Debian France Debian Handbook Debian Live Distro Tracker dpkg dpkg-source Flattr Flattr FOSS Freexian Funding Git GNOME GSOC HOWTO Interview LTS Me Multiarch nautilus-dropbox News Packaging pkg-security Programming PTS publican python-django Reference release rolling synaptic Ubuntu WordPress

Recent Posts

  • How to choose your SSH agent with Wayland and systemd
  • Freexian is looking to expand its team with more Debian contributors
  • Freexian’s report about Debian Long Term Support, July 2022
  • Freexian’s report about Debian Long Term Support, June 2022
  • Freexian’s report about Debian Long Term Support, May 2022

Copyright © 2005-2021 Raphaël Hertzog